Friday, June 26, 2015

What do you do with all those circles you cut out for window cards? Let's use them!

When my class made the Blooming With Kindness sympathy card last month, we had the 3 inch whisper white circles we cut out in a pile headed for the trash.  I just could not throw them away so I grabbed the nearest stamp that would fit and started this card.  I colored the flowers with Daffodil Delight and the leaves and stems with Wild Wasabi Blendabilities.  I will try different stamps on the other circles and let you see them later.

This is tent card measures 4 1/4" x 11", scored at 5 1/2".
I still had that stash of 2010 retired card stock on my table so I used Handsome Hunter for the card base and the lighter Mellow Moss cut to 4" x 5 1/4".

The Whisper White circles I had were 3".  So I cut the Crushed Curry with the 3 1/4" and the Handsome Hunter with the 3 1/2" circles framelits.

The sentiment on a scrap of Whisper White is from the retired Fabulous Florets stamp set.  It is mounted on Crushed Curry card stock.  A piece of Crushed Curry Baker's Twine is threaded through a Crushed Curry button from a Sale-a-Bration ribbon and button set.  Then tied into a bow and adhered with a Mini Glue Dot.

And, I can hardly make a flower card without a butterfly so I stamped one from the Papillon Potpourri stamp set onto a scrap of Crushed Curry with  Early Espresso ink; used the Bitty Butterfly punch and adhered it with a Mini Glue Dot.  

If you do not have a hoarded stash of the 2010 card stock, use your favorite greens or another color. 

Current products used on this card may be seen below.  If you wish to purchase any of them, just click on the photo and you will be taken directly to my on-line store.  I appreciate your business.

Happy Stampin'.  Thanks for stopping by. 

Built for Free Using: My Stampin Blog

So how did Stampin' Up! peeps color before Blendabilities came along?

One way is with Stampin' Write Markers and a blender pen.  I decided to practice using the retired People Like You stamp.  It was fun and I am pleased with the results.

I stamped onto a 3" x 4 3/4" piece of Crisp Cantaloupe card stock with Mementos Tuxedo Black ink.  This looked a bit plain so I grabbed the Crisp Cantaloupe and Calypso Coral markers and started coloring.  With hopes of adding a little shading, I tried the Blender Pen.  It moved some color but not much.  I colored the stamens with a Daffodil Delight and the stems with Pistachio Pudding markers.

Remember, I was coloring on regular card stock so I had to be careful not to over work the markers and blender pen.  Whew, it did not tear!

I stamped the sentiment portion of the stamp onto a scrap of Crisp Cantaloupe card stock with VersaMark ink and sprinkled it with black embossing powder.  Then I heat set, fussy cut it out and raised it with Stampin; Dimensionals.  I still love to watch the embossing powder melt.

The Pistachio Pudding card base is 8 1/2" x 5 1/2", scored at 4 1/4".  The backing for the stamped card stock is a 3 1/4" x 5" piece of Basic Black.

I notched the top and bottom of the left side of the card to hold a piece of retired Crisp Cantaloupe Thick Baker's Twine.  A piece of the current Calypso Coral Thick Baker's Twine would look nice as a substitute. 

Once again, I was in a "use up the retired stock!" mood.  However, this card would look just as nice using Pear Pizzazz and Calypso Coral card stocks and inks.   And, how about the new Mint Macaron and Watermelon Wonder on Tip Top Taupe?  Try different color combinations!

See the new 2015-2017 In-Colors on page 137 of the Annual Catalog or see them in my on-line store here.

Leave me a comment of the color combinations you used.  Thanks for stopping by.

Father's Day Card 2015

Father's Day came quickly for me this year so I am most thankful to Kathleen Wingerson for her lovely card that inspired me. With a few changes I made the card below.  It works as a masculine card for any occasion.  I hope you have a sheet of the  Designer Series Paper from the 2015 Occasions catalog left as it really sets the tone.  Use a dark green as the card base, add a lighter green or whisper white sheet cut 1/4 inch smaller, add the wooded scene from the DSP cut 1/4 inch smaller; and, voila, you have a great base for a serene card.  My family tends to get my retired card stock and so I used Handsome Hunter and Mellow Moss.  I stamped the bird from the Moon Lake stamp set onto whisper white card stock.   Add a couple of small brads and you are set to go. 


Wednesday, June 24, 2015

Stain Glass Butterfly

If it is a butterfly, I love it!  While I wait for my new Watercolor Wings Stamp Set and Bold Butterfly Franelits Dies to arrive, I'll just make a stained glass butterfly card using the Butterflies Thinlits.  Both thinlits may be seen on page 172 of the 2015 - 2016 Stampin' Up! Annual Catalog.  The coordinating stamp sets may be seen on page 75 and page 124 of the catalog.  To see all the bundles, click here.
Here is what you need to make this card. 
 

Card stock dimensions:
Crushed Curry base = 5 1/2" x 11", scored at 4 1/4"
Basic Black = 5 1/4" x 4", scrap at least 3 1/2" x 2 1/2"
Whisper White = 3 1/2" x 2 1/2", and 1" x 2"
Island Indigo =  5 3/8" x 3 7/8", embossed with folder of your choice
Tangelo Twist, Crushed Curry, Black StazOn ink pads 
Papillion Potpourri Stamp Set
About 1/3 of a 4" round doily
Bitty Butterfly punch
6 " Crushed Curry or Daffodil Delight ribbon & 3" for knotted bow
Small Glue dots, Stampin' Dimensionals and your favorite adhesive
Pearls or Rhinestones
Sponge dauber or sponge
Butterflies Thinlit and Big Shot Cutting Machine


Die cut the black butterfly.  Use the scrap to trace a light outline onto the white.  Sponge or daub the inks onto the larger white card stock.  Do not stay within the lines!  Cut out inked butterfly before adhering to the black cutout.  Using a very small amount of glue on the thicker parts of the black butterfly, adhere butterflies together.  Trim any white edges.  If you still see white, use the side of a black Stampin' Write Marker to cover.  Add jewels to the body.

Adhere the doily piece to left edge of the embossed Island Indigo card stock using a snail.  If using liquid glue, only use a thin stripe down the cut edge of the doily.  Place ribbon at left edge of Island Indigo card stock to cover doily cut edge.  I like to use double sided tape on the back to hold ribbon in place.  Just be careful not to put it down on something before you are ready to adhere it to the black card stock.  Adhere to Crushed Curry card base.

Place butterfly onto card front with Stampin' Dimensionals.  I glued the center of the body to the card and doily and then added dimensionals about 1/2 inch away to help the butterfly look like she is flying.
Stamp 2 small butterflies with StazOn black ink onto small scrap of Whisper White card stock.   Daub, sponge or aqua paint with Crushed Curry and Tangelo Twist inks.  Punch out with Bitty Butterfly punch and adhere with small glue dots.

The butterflies colors may be substituted with your choice.  I particularly like them done with Perfect Plum and Pink Pirouette ink.  Leave me a comment with your color choices.

Thanks for stopping by.

To purchase any of the supplies used for this card, click on the item below.
Built for Free Using: My Stampin Blog

Saturday, June 13, 2015

Swingin' Circle Card


As usual, I hoarded my beautiful Stampin' Up! Designer Series Paper (DSP) which is now retired.  I decided it might be time to cut some of this pretty Beyond the Garden DSP so I will have room for the new 2015 - 2016 DSP!  I must have been in a nostalgic mood because I used the small leaf stamp from the now retired Fabulous Floret set with Crumb Cake ink (stamped off) to make my own DSP for the inside.  Well, can you call it "the inside" when you use the Circle Card Thinlit?  What do you think?


Excuse my finger at the bottom of the picture.  I wanted you to see it closed the way it comes out of an envelope.

It is easy to cut the DSP to coordinate with the circle card by lining up the 1 7/8" x 5 1/4" piece of paper just inside the smaller side on the cutting edge of the thinlit.  Then run it through the Big Shot with the cut side up, so that you can see the placement, using your usual "sandwich".  Do the same thing with the 2 3/4" x 5 1/4" Whisper White card stock DSP you made yourself by lining it up with the larger side of the thinlit.

The card stock base is a 6" x 5 1/2" piece of Tangerine Twist.  The flower from Secret Garden Stamp Set and the "Hello" Swirls and Curls Verse  below are stamped with Pacific Point.  Punch both out with a 2" circle punch.  The background Pacific Point card stock is cut with the 2 3/8" scallop circle punch.

Here is the card when opened.  You may wish to sign you card on the left side of the white card stock so that your signature stays hidden behind the accordian fold.  Or not. 
Now it is your turn to use some of your left over DSP!  Any stamp that fits into a 2 " circle would look great.  If the pattern on the reverse side of your chosen DSP is not too busy, it will look nice on the right side. 

For the punches, thinlit die, card stock and inks, see below.

Built for Free Using: My Stampin Blog

Thursday, June 11, 2015

More Stampin' Up! videos!

Have you seen the new Stampin'Up! envelope paper?  It is gorgeous and so easy to make an envelope out of either neutral colored papers or 2015-2017 In Color papers seen on page 149 of the Annual catalog or at my on line store, here.  The envelope paper is thicker than Designer Series Paper and thinner than card stock.  It is just the right weight to make a quality envelope.  The paper is double sided so the inside of your envelope will be pretty, too.  The paper coordinates with the envelope punch board found on page 150 of the Annual catalog or at my on line store, here.


Here is a quick Stampin'Up! video to show how to color with a blender pen.  The artist is using A Happy Thing stamp set from the 2015 Sale-A-Bration catalog.  Notice that she colors the leaves from dark areas to light.


So what is the difference between watercoloring with a blender pen and an aqua pen?  Watch this video for an answer.


The control freak in me has difficulty working with an Aqua Painter to color within an outline, but I love to use it for backgrounds.  As the artist in the video said, the Blender Pen allows you more control over the ink.  Both Aqua Painters and Blender Pens can be seen on page 163 of the 2015 - 2016 Annual catalog, or here for aqua, and here for Blender Pens. 

I have picked up a few hints about painting within the lines using an Aqua Painter.  After I practice, I will share some tips with you.  Wow, I feel a whole series about watercoloring with ink coming on.  Check back next week to find out what I learn!  

Saturday, June 6, 2015

Stampin'Up! has released several videos featuring new products from the 2015 - 2016 Annual Catalog.  Check them out.

I absolutely have to order this!  What fun it will be to make 16 cards so quickly!  And, then they will store so nicely in the included tin.  Maybe I should make a few sets for gifts.  How about you?  See the Tin of Cards Project Kit on page 152 of the annual catalog or click here.

Wow, I just might be inspired to start baking!  The Baker's Box Thinlits are found on page 171 of the 2015-2016 Annual catalog or click here.

If you prefer gift bags to boxes,watch this video to see how cute the bags are made with the Gift Bag Punch Board found on page 150 of the Annual catalog or see it at my on line store here.

I ordered the Gift Bag Punch Board and am excited to use it in one of my upcoming classes.  It looks like it will be easy to use! 

I hope you have enjoyed watching these videos.  Check back later for more Stampin'Up! product videos. 

Friday, June 5, 2015

Stampin'Up! has a promotion the month of June, 2015 for new demonstrator's to chose 2 free stamp sets with their starter kit.  You may chose the items you would like in your starter kits plus the additional 2 stamps sets! Join the fun and enjoy the sharing and support of the Luv 2 Stamp group.  Check it out.  For more information, see my Demonstrator Web Site. 

Wednesday, June 3, 2015

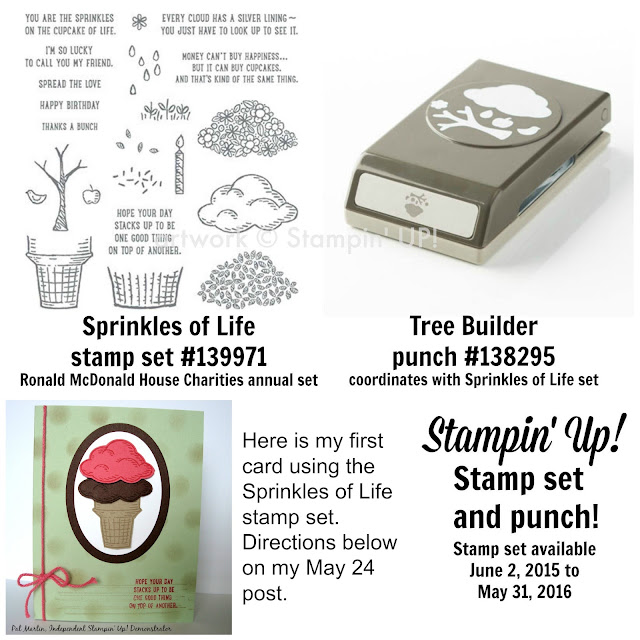
I just had to share Stampin' Up!'s new 2015 - 2016 Ronald McDonald House Charity stamp set with coordinating punch.  I love the versatility of the stamp set.  Look at all the mix and match choices!  And, the various sentiments.  The possibilities are endless!  I love that Stampin' Up! donates a portion of the proceeds to the Ronald McDonald House Charities for each Sprinkles of Life stamp set they sell. If you want to grab one of these photopolymer stamp sets and/or the punch, see here for the stamp set.  And, here for the punch.


I will be adding more samples soon! 

What shall I try next?  Maybe the tree with some apples hanging on it and the bird sitting on a branch?  Or, the basket full of flowers?  Oh, but I have so many flavors of ice cream to add to the cone................ I better get busy!

A big thank you to Patty Bennett, Senior Executive and Team Leader of the Luv2Stamp Group for the use of her graphics!  She is such a blessing to all of us.  See the benefits of becoming a member of my Stampin' UP! team here.  Then click on the "join now" button for detail.

Thanks for stopping by. 

Tuesday, June 2, 2015

June 2, 2015 - A Great Day to Order From Stampin' UP!

Today is a special day at Stampin' Up! 

Lucky for all of us!  We can order from the 2014-2015 and 2015-2016 Annual Catalogs and the 2015 Occasions catalog!  We can even add retiring items and clearance rack items!  And, any merchandise order totaling $150. or above is eligible for the 2014-2015 Hostess Reward program!  Shop June 2, 2015 before midnight Mountain Time here. 

This is a one day opportunity.  Tomorrow all merchandise ordered will come from the 2015 - 2016 Annual Catalog.  Of course, the clearance rack items will be available, too.  But, the retiring items will be gone.

Happy Shopping and Happy Stamping!