Showing posts with label Stampin' Up! Cards. Show all posts

Thursday, July 21, 2016

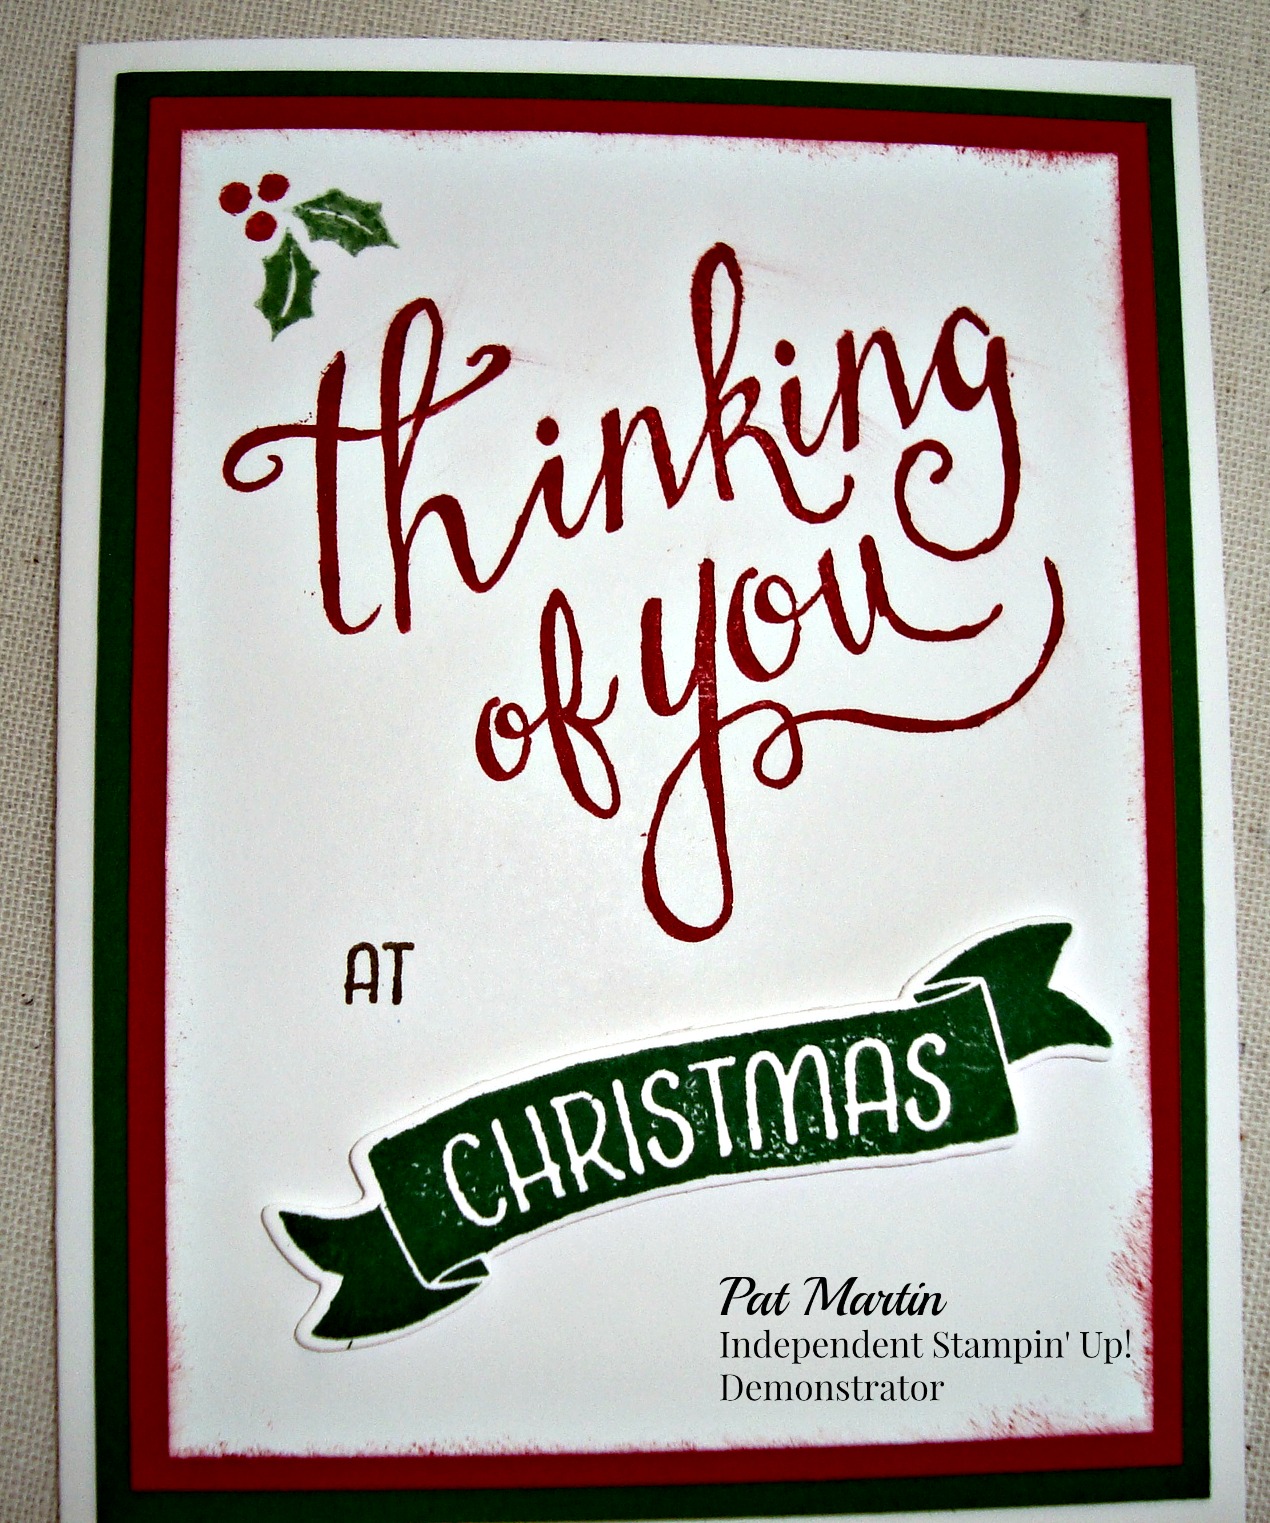
Easy Christmas Card

Make this easy Christmas card with the Stampin' Up! host set #141790 found on page 201.
I used Whisper White card stock, 5 1/2" x 8 1/2" scored at 4 1/4"as the base.
Other card stock needs:
162584 Garden Green, 4" x 5 1/4"
102482 Real Red, 3 3/4" x 5"
100730 Whisper White, 3 1/2" x 4 3/4"
Inks:
126975 Crumb Cake
126949 Real Red
126973 Garden Green
Directions:  Stamp "Thinking of You" on smaller Whisper White card stock near the top, saving room for the holly leaf with Real Red ink.

Stamp "Christmas" with Garden Green ink on a scrap of Whisper White.  Die cut the word with the coordinating #141488 Bunch of Banners Framelits.  Attach with dimensionals.

Stamp "at" with Crumb Cake ink.  Stamp the holly with Garden Green and Real Red ink.  Adhere your stamped Whisper White to the Real Red card stock, adhere both to the Garden Green card stock.  Adhere all to the Whisper White card base.

To purchase any of the products mentioned above, click here.  The host stamp set is available as a reward for purchasing $150 or more in merchandise.

The host set is versatile in that it has banners that say "BIRTHDAY"," ALWAYS", "TIME OF YEAR" as well as "CHRISTMAS"; cute embellishments like the holly leaves and transitioning words like "at" such as "this", "on your".  Now might be the time to reward yourself with a $150 order and choose Time of Year stamp set as part of your reward.

Thank you for stopping by.  See another card made using Time of Year set on another post on this site.

JOY - It is Christmas in July!

I love this Joyful Nativity stamp set!  With the large "JOY" word, you have your card nearly made after you stamp it!

To make this card, here is what you need:

141565 Joyful Nativity photopolymer stamp set

Card stocks:
101650 Very Vanilla, 8 1/2" x 5 1/2" card base.  3 1/2" x 4 3/4"
102584 Garden Green, 3 3/4" x 5"
119685 Cherry Cobbler, 4" x 5 1/4"
141628 This Christmas Designer Series Paper 1" x 4 3/4"

Inks:
126966 Cherry Cobbler
102283 Versamark

Misc.
103083 Embossing Buddy
109129 Gold Embossing Powder
129053 Heat Tool

Stamp "JOY" landscape in the upper third of the smaller Very Vanilla card stock with Cherry Cobbler ink.  Let dry briefly, then use your embossing buddy on the inside of the "O".  With Versamark, stamp the angel.  Sprinkle with gold embossing powder, shake off the excess, and heat until melted.  Adhere DSP along the bottom of the card. Adhere stamped Very Vanilla to Garden Green, then both to Cherry Cobbler panel and then all to the Very Vanilla card base.

To purchase any of the products used on this card, click here.  Thank you for shopping with me!
For more cards using the 2016 Joyful Nativity Stamp Set, see this site.

Thursday, February 11, 2016

Do you want a balloon? They are FREE.....well, they were during 2016 Sale-A-Bration. I just might have an extra one to share, contact me.

I love rubber stamps!  I love baby animals!  I love FREE things!  So, just look at what happens when I have all three things together!  This cutie and his balloons are part of one of the Stampin'Up! FREE Sale-A-Brations (SAB) stamp sets.  See all of the set on page 15 of the SAB catalog.

Onto water color paper, I stamped this cutie and his balloons with the Black Archival Stampin' Pad (page 28, Occasions catalog) because it is a permanent ink and perfect for water coloring.  TIP:  Make a mask for the bird before adding the balloons with strings.

With my Aqua Painter I painted the chickie using Hello Honey Classic Stampin' Pad; the balloons with Tempting Turquoise and Tangerine Tango; the ribbons are Blackberry Bliss and Garden Green respectively.  I painted his beak and feet with Crumb Cake.  When the feet were dry, I added a swipe of the Tangerine Tango.

The balloons are decorated with the small flower and leaf stamps from the Blissful Bouquet Paper Pumpkin kit with corresponding ink.


Additional supplies used with this card:
8 1/2" x 5 1/2" Hello Honey card stock (CS), scored at 4 1/4"
4" x 5 1/4" Blackberry Bliss CS
3 3/4" x 5" water color paper
1" x 3" Painted Blooms Designer Series Paper (DSP)
Banner Triple Punch
Word Window Punch
scrap of Whisper White CS
Hello Life Stamp Set
Wink of Stella

TIP: I cut a mask to go around the outside of the balloons before I added the designs to that I could stamp part of the flower and/or leaf to appear as if it continues around the sides and back of the balloon.

I had so much fun with this chickie that I made another one with the colors from the SAB Wildflower Fields DSP to use it as the banner at the bottom of the card.  Because, as you know, I love that word FREE, so I have the DSP!!!  You can have some too, just click on the items below to order.  For every $50 of merchandise that you order between now and March 31, 2015 you can choose a SAB item for FREE!!!  If you want to choose the DSP, the number is 141022.  The Honeycomb Happiness stamp set is 141288 in wood and 141291 in clear. 


Built for Free Using: My Stampin Blog

Tuesday, October 27, 2015

A little twist on the October 2015 Paper Pumpkin Kit

October is Breast Cancer Awareness Month.  Stampin'Up!'s October Paper Pumpkin kit came in a pink box.  I liked the cards so much I ordered a refill this morning!  If you are not already a Paper Pumpkin subscriber and would like to join the fun, click here.  Stampin'Up! will send an email to redeem your subscription.  If you are a subscriber, you can order refill kits here.  The refills come at a deep discount and do not have the stamp set or ink spot.


 How do you like what I added to the cards this month?


By stamping the flowers from the included stamp set onto the card base, envelope and  banner, my card is just a little different than the directions suggested.  I also sponged the edges of the flowered circle with Lost Lagoon ink to match the small flowers on the designer card stock.

On the card below, I added some 2013 - 2015 In Color Sequins which happen to be on the Clearance Rack for $1.99 as of October 26, 2015.  Check it out here.

With simple additions or changes you can make a kit your own.

I am still working on an alternative for the third set of cards in this month's kit.  I want to add some more bling!  I'll post it soon.

Thanks for stopping by!


Monday, September 21, 2015

Have a FaBOOlous Halloween!

You do not need to be a huge fan of Halloween to like these little guys on Stampin' Up!'s Happy Haunting Designer Series Paper on page 47 of the Holiday catalog.  Take a look at how they go well with the Host Reward Six Sayings stamp set on page 51 of the Holiday catalog.  The Six Sayings Set is one you will want to get. You can choose this stamp set when you submit an order of at least $150. here.  In addition to "FaBOOlous", there are 5 other sayings great for the fall holiday season.  I had to have this set for the "Thankful" stamp but can't wait to use all 6 of the stamps.

Yes, another window scene!  The leaves are falling, pumpkins are ripe for cooking or making a Jack-o-Lanterns and there is a nip in the air.  So glad I am inside looking out at this scene.  

The measurements are underlined for your convenience. 
The A2 card base is Very Vanilla card stock.  The 2014-2015 In-Color, Tangelo Twist card stock behind the DSP is 4" x 5 1/4".  The Happy Haunting DSP is cut at 3 3/4" x 5".  I die cut the window from a 2 3/4" x 3 3/4" piece of Crumb Cake card stock.  The "scene" , stamped with Crumb Cake ink, fits behind the embossed marks of the window and is on about a 2 3/8  " x  3" piece of Very Vanilla card stock.  The pumpkins are colored with a Stampin' Write Tangelo Twist marker.  The leaves are colored with various fall colors of Stampin' Write markers.  "FaBOOlous" is stamped on a 1" x 5 1/4" piece of Very Vanilla card stock with Mementos Tuxedo Black ink.  The orange sequins add a little pizzazz.  I adhered everything with SNAIL adhesive except the window frame where I used Stampin' Dimensionals.

To order any of the items that were used to make this FaBOOlous card , click on the picture below to start an order.  Notice that I list the stamp set and thinlits die separately and as a bundle.  The bundle saves you 15% over the individual pieces.  You're going to love the 16 pieces of the Happy Scenes stamp set so just enjoy the 15% savings by buying the bundle.
 
Built for Free Using: My Stampin Blog

Saturday, August 29, 2015

Water Coloring with Glycerin Technique

The beautiful hydrangea flower is from the Host set, Best Thoughts, as seen on page 180 of the Annual Catalog or here. You can choose this set as part of your rewards for placing an order of $150 or more.  Get a few friends together to order and you will have earned this set soon.  Leave me a message for more information about how to earn this set.

The card base is 8 1/2' x 5 1/2" Pink Pirouette card stock, scored at 4 1/4"; the second layer is 3 3/4"x 5" Smoky Slate card stock.  The flower and sentiment are stamped with Jet Black Stazon ink onto water color paper.  You can also stamp with Versa Mark ink and heat emboss with black embossing powder.  The inks used to paint the flower are Old Olive for the leaves, Perfect Plum for the petals and Delightful Dijon for the stamens.

Glycerin is readily available at pharmacy department of many stores.  The bottle will last you a long time as you use just a drop or two for each color.

Get out your Perfect Plum and Old Olive ink refill bottles, your aqua painter or a small artist paint brush, a palette or small plastic lid and you are ready to go!
Thank you, Lynne Ernst, for sharing this wonderful water coloring with glycerin technique with me.Place a drop or two of Perfect Plum ink onto your palette.  Nearby add a drop of glycerin and in another area add a drop of water if using a dry paint brush.  If using an aqua painter, squeeze to moisten the brush and wipe on a paper towel until the brush is just damp.  You can always add more water, but, it is more difficult to dry a thirsty brush.  Drag a small amount of ink and glycerin together and mix.  Do not mix all of it together in the beginning so that you will have control of your color intensity and ability to glide the brush.  Test your color on a scrap.  Add more color, if desired.  If your brush feels dry and is dragging, add a tiny amount of water.  It is a bit of a trial and error science!  You will quickly feel when you need more liquid.  When in doubt as to the gliding, add more glycerin before adding more water.  Continue in this fashion for the entire painting.   
You do not need to color within all the lines here,so it goes rather quickly.  Just be careful to stay within the lines at the outer edges of the flower petals and leaves. Let the first coat of ink dry and then return with more ink to add shadows.  The glycerin slows down the drying so you may want to use a hairdryer to speed the process.  Be careful not to get it too hot or the paper will warp.  The stamp helps you determine where there should be depth by the lines within the petals and leaves.  Remember that where one petal overlaps another, the under petal will be shadowed and is a place to add more color.  If you can avoid the stamens, use Daffodil Delight ink to color them.  If you are like me and just can't keep the purple from going into the stamens, just dab a little Delightful Dijon where it should be and when it dries add Dazzling Details.  Dazzling Details also comes with a gold glitter you might like.  You can order Dazzling Details and all other products used in this card at my on-line store. 

Stamp the sentiment onto a 3/4" wide piece of card stock.  I used water color paper to match the paper used for the flower.  Use a piece long enough to cut into a flag shape, if desired.  Cut a piece of Smoky Slate card stock to fit behind your sentiment leaving a 1/8" border.  Cut one end into a flag shape.  Or use the Banner Framelits seen here. 

The ribbon is a retired piece of Perfect Plum from my stash. 

I did this same card in Wisteria Wonder, Calypso Coral and Tangerine Tango mixed with Daffodil Delight.  Choose your color and start painting!  

Thank you for dropping in today.  

The products I used for this card are listed below.  Click on any item to order it sent directly to your home.  Thank you. 
                                                                         Built for Free Using: My Stampin Blog
Other items you will need for this card and for many other projects you do are listed below.  Some of the items are suggestions you might want to substitute, such as the embossing powder and others.  To order any of the items, click on the item to connect with my on-line store.
Built for Free Using: My Stampin Blog

Saturday, June 13, 2015

Swingin' Circle Card


As usual, I hoarded my beautiful Stampin' Up! Designer Series Paper (DSP) which is now retired.  I decided it might be time to cut some of this pretty Beyond the Garden DSP so I will have room for the new 2015 - 2016 DSP!  I must have been in a nostalgic mood because I used the small leaf stamp from the now retired Fabulous Floret set with Crumb Cake ink (stamped off) to make my own DSP for the inside.  Well, can you call it "the inside" when you use the Circle Card Thinlit?  What do you think?


Excuse my finger at the bottom of the picture.  I wanted you to see it closed the way it comes out of an envelope.

It is easy to cut the DSP to coordinate with the circle card by lining up the 1 7/8" x 5 1/4" piece of paper just inside the smaller side on the cutting edge of the thinlit.  Then run it through the Big Shot with the cut side up, so that you can see the placement, using your usual "sandwich".  Do the same thing with the 2 3/4" x 5 1/4" Whisper White card stock DSP you made yourself by lining it up with the larger side of the thinlit.

The card stock base is a 6" x 5 1/2" piece of Tangerine Twist.  The flower from Secret Garden Stamp Set and the "Hello" Swirls and Curls Verse  below are stamped with Pacific Point.  Punch both out with a 2" circle punch.  The background Pacific Point card stock is cut with the 2 3/8" scallop circle punch.

Here is the card when opened.  You may wish to sign you card on the left side of the white card stock so that your signature stays hidden behind the accordian fold.  Or not. 
Now it is your turn to use some of your left over DSP!  Any stamp that fits into a 2 " circle would look great.  If the pattern on the reverse side of your chosen DSP is not too busy, it will look nice on the right side. 

For the punches, thinlit die, card stock and inks, see below.

Built for Free Using: My Stampin Blog

Sunday, May 24, 2015

Sprinkles of Life - Ronald MacDonald House Charities Stamp Set

A cone with chocolate and strawberry ice cream!  Yum-m-m.


The Strawberry Slush and Pistachio Pudding card stocks are retiring. Time is short to get a supply of the retiring 2014-2015 In-Colors.  If you love them as much as I do, click here now.


The new 2005-2016 In-Colors. Watermelon Wonder and Mint Macaron will substitute nicely.   They will be available on June 2, 2015.


Card dimensions and directions remain the same whether you use my choice of colors or chose your own.


Card base = 5 1/2 " x 8 1/2", scored at 4 1/4"
Chocolate Chip card stock oval cut with 3rd from smallest Stampin' Up! Ovals Collection Framelit.
Whisper White card stock oval cut with the 2nd from smallest Stampin' Up! Ovals Collection Framelit.
Top ice cream = Strawberry Slush ink and card stock.  Punch with Tree Builder Punch.
Bottom ice cream= Chocolate Chip ink and card stock.  Punch with Tree Builder Punch.
Cone = Soft Suede ink and card stock.  Cone must be fussy cut.

Soft Suede background dots are dauber sponged over dots from the Dots and Stripes Decorative Masks.

Stamp the pieces and adhere using Stampin' Dimensionals.  Tip:  I gently rounded the cone using a pencil side in the palm of my hand so that the edges would touch the card base.  Adhere the ovals to each other and the card base.

Soft Suede stripes behind the sentiment are from the Gorgeous Grunge stamp set.

Sentiment is stamped with Strawberry Slush ink.

Tie a bow of Strawberry Slush Thick Baker's Twine.  Tip:  Punch half a hole using the 1/16 inch hand held punch top and bottom of the card edge to hold the twine in place. 

I am going to try this same card design using different flavors of ice cream.  What flavors will you chose?

Built for Free Using: My Stampin Blog

Saturday, May 23, 2015

Sheltering Tree Friendship Swing

You already know I love stamp sets that are versatile.  Well, here is another one!  Sheltering Tree stamp set has "a tree for all seasons" with a swing, leaves and a rake, bicycle, flowers - even snow!  One hint, the bicycle frame is a separate stamp so that you can make your bicycle any color you want.  But, don't forget it when you stamp your design!  The "splotch" works well as ground, grass or sky.  You can probably find even more uses for the pieces.


I love a bargain!  So I want to share them with you.  I want to use the Large Scallop Edgelit and the Essentials paper piercing template while they are on sale at Stampin' Up!.

The Crisp Cantaloup Thick Baker's Twine and In Color Stampin' Write Markers are on sale, too.   Hurry before these items are no longer available.  They retire on June 2, 2015.  There are many retiring items discounted now.  See all of them here.


Dimensions are:
Marina Mist card stock base = 8 1/2" x 5 1/2", scored at 4 1/4".
Whisper White card Stock for design = 5 1/4" x 3 7/8" and inside = 5 1/4" x 4".

With Marina Mist card stock oriented landscape and opened flat, align the Large Scallop Edgelit near the right edge of the card stock.  Use the Big Shot and cut the right front edge of the Marina Mist card stock.  Align the Essential paper piercing template and pierce along the scalloped edge.  With the Big Shot, cut the right edge of the smaller piece of Whisper White card stock with the same edgelit.  Align the same template and pierce the edge of the Whisper White card stock..   

With the scalloped edge to the right, stamp the tree trunk with Soft Suede Classic Stampin' Pad in the middle of the scalloped Whisper White card stock.  Stamp the leaves with Pear Pizzazz Classic Stampin' Pad ink.  Ink the leaves with  Old Olive Classic Stampin' Pad; then using a Mossy Meadow Stampin' Write Marker, over mark about 10% of the leaves in a scattered fashion.  Huff on the stamped leaves to reactive the ink and stamp the leaves slightly offset from the already stamped leaves.  Double stamping gives the leaves more depth.

Stamp the swing on a bottom branch.  I used Soft Suede Stampin' Write Marker for the rope and Early Espresso marker for the seat of the swing.
Stamp the sky with Soft Sky Classic Stampin' Pad ink on the "splotch" stamp.  Stamp off without adding more ink slightly higher but so that they overlap.  Clean the "splotch" and stamp under the tree with Pear Pizzazz ink and then Old Olive ink.  Overlap the "grass" colors.

If desired, stamp a greeting under the tree with any of the ink pads mentioned above.

To adhere the stamped card stock to the Marina Mist card base, you should have about as much space showing to the left and right of the piercing on the scalloped area of the Marina Mist card base.  Glue into place.

Tie a length of Crisp Cantaloupe twine around the left edge of the card.  TIP:  To stabilize your twine, use a 1/16th inch hand held punch, make a groove top and bottom of the card front 1/4 inch in from the left fold.  Position the punch to only cut half of the circle.

Stamp a greeting onto the larger piece of  Whisper White card stock with Marina Mist Classic Stampin' Pad.  Adhere to the inside of the card.

Below are the Stampin' Up! products I used.  Several are on sale until June 2. 2015 or until supplies are gone.  See here.


Built for Free Using: My Stampin Blog

Friday, May 22, 2015

It's a Cupcake Kind of Day!

Who doesn't like a smiling cherry atop a cupcake?  I just can not let go of the 2013- 2015 In Colors!  Here is a birthday card using Soft Suede "chocolate" cake bases with Pistachio Pudding, Daffodil Delight and Strawberry Slush frosting. 

Use the Cupcake Party stamp set and stamp scraps of Whisper White card stock with Soft Suede ink for the cake bottoms.  Use other scraps to stamp the "pistachio pudding, lemon (daffodil delight) and strawberry slush frosting".  Punch them out using the Cupcake Builder punch on page 223 of the 2014-15 annual catalog.  (Or page 187 of the 2015 -16 catalog.)  TIP:  Use small scraps and a sticky note to hold the stamped pieces in place to avoid wasting card stock on cut outs you do not want to use.

Card stock dimensions are:
Daffodil Delight card base is 8 1/2" x 5 1/2" , scored at 4 1/4" .
Calypso Coral is 2 1/2 " x 4 1/2 ".  The edge is punched with a retired punch.  Any edge punch would look nice.
Coastal Cabana is 2" x 4 1/4".
Whisper White is 1 7/8" x 4 1/8".

Adhere the cupcake bottoms to the Whisper White card stock.  Use Stampin' Dimensionals to raise the "frosting" above the cake bottom.  Add a cherry or HB flag on top!

Sale-A-Bration Best Day Ever Designer Series Paper, 1" x 5 1/2",  is adhered across the bottom of the Daffodil Delight card stock with a banner cut greeting raised with Stampin' Dimensionals on the right side. 

 Although it is a fun birthday card, you could leave off the HB flag and use it for any occasion.  Leave me a comment telling for what occasion you used this card.  Thanks for stopping by.

Here are the supplies I used to make "It's a Cupcake Kind of Day" card.


Built for Free Using: My Stampin Blog

Thursday, May 21, 2015

Blooming with Kindness

I am always sad when Stampin' Up! retires a stamp set that I find very versatile, like Blooming with Kindness.  But, the good news is that there are new stamp sets with great versatility in the 2015 - 2016 catalog which will be available on June 2, 2015!  Yeah!!  Before Blooming with Kindness retires, I wanted to share two cards with you.  If you like this stamp set, too, you can purchase it until June 2, 2015.  The clear set is sold at regular price, but the wood mount stamp set is discounted to $17.21 now.  You can purchase it at a discount here.  Oh, you prefer clear sets?   See the clear set here.

These two cards use the same design but different techniques.


The flower on the birthday card to the right is stamped onto Perfect Plum card stock with Whisper White Craft ink, immediately sprinkled with white embossing powder, then heated to set. 


The above sympathy card is stamped with Perfect Plum ink onto Whisper White card stock. 
 

The remainder of the cards are done alike.  The overlaid card stock, Pink Pirouette on the sympathy card and Whisper White on the birthday card, are made with the Big Shot using the 3 inch die from the Circles Collection on page 231 of the annual catalog.  Then they are dry embossed with the Perfect Polka Dots folder on page 226 of the annual catalog.

I will use the sympathy card to demonstrate the remainder of the steps to complete either card.


 Position the overlay card stock atop the card base.  Hold one side with fingers and thumb spread to hold the entire length of the card in position.  Gently slip the Stamp-a-ma-jig 's stamped mylar sheet under the overlay and position it inside the cutout circle.


Carefully remove the overlay card stock and set it aside.  Position the Stamp-a-ma-jig at the edge of the stamped mylar sheet, remove mylar and stamp the flower onto the front of the card base.


The greetings are stamped on a scrap of Whisper White card stock.  The Perfect Plum taffeta ribbon was in my stash.  You can pleat with any soft ribbon.


Cut a length of Sticky Strip found on page 204 in the annual catalog.  If you do not have Sticky Strip, hurry, it is retiring on June 2, 2015.   Secure one end of the ribbon to the back of the overlay card stock.  TIP:  Leave the protective red plastic on the end of the sticky strip that will wrap to the back at the end to prevent it from sticking to your work surface.  Begin to pleat the ribbon by pushing it onto the tape.  Continue to pleat until you reach where you wish to adhere the greeting.   Secure the edge on the back of the card stock.  If you wish to use a piece of a doily, abut the top edge of the doily to the ribbon and adhere before adding the greeting. Adhere greeting to ribbon.


Align completed overlay onto stamped Whisper White card base.


Here are the items used to make these cards.  Many of them are already in your craft space!  To purchase any items, click here.
Built for Free Using: My Stampin Blog

Good grief, Charlie Brown, I forgot to tell you about the Stamp-a-ma-jig!  Love this handy little gadget!

Built for Free Using: My Stampin Blog

Thursday, April 16, 2015

Folding Screen Card

Wrap a folded screen card with ribbon and it makes a wonderful tag for a present.  Open it and you have a display piece.


I just started pulling stamp sets, current and retired, off my shelf and started stamping.  You can do the same.


 Here is how to get started.

The screen is 5 1/2 " x 11 Basic Black card stock, scored at 3 3/4", 5 1/2" and 8 1/4".  Accordion fold.


Stamp the edge quarter inch of 4 each 4 5/8" x 2 1/2" pieces of Real Red card stock with Mementos Tuxedo black ink.


Cut 4 pieces of Whisper White card stock to 4 1/8" x 2".  Use Mementos Tuxedo Black ink to stamp each panel with the designs above, or use stamps that you like.


TIP:  Use part of a flower or branch instead of the entire design.  Your eye will travel to the next panel more readily.


Adhere the stamped Whisper White panels to 4 panels of Basic Black cut to 4 1/4" x 2 1/8".   Then adhere to the stamped red panels.


Now let's make the legs for your screen.  


Fold the 2 outer panels inward.  Center 2 panels between the top outer edges of the Decorative Label Punch.  Line up the bottom of the screen panels just above the pointed flared edge on the sides of the punch opening.  Punch.  Repeat on the other 2 panels.  There you go, 4 legs!


Attach each stamped panel to a panel section of the Basic Black screen. 


Tie a ribbon around the folded screen to use as a gift or add to a package.  Mail it in a medium envelope, 5 3/4" x 4 3/8", for standard postage.  If you want to use the Envelope Punch Board on page 194 of the Annual Catalog to make an envelope that fits more snugly, the USPS will charge you extra postage.

The stamp set ideas for this folded screen card are endless depending upon who you make it for.  Use a sport motif, flowers, musical instruments, seashells from the By the Seashore stamp set on page 172 or baby items from the Something For Baby stamp set on page 74 of the Annual Catalog.  Let your imagine run wild as you browse through the catalog.  Then leave me a comment below to tell me how you used this folded screen design.

Here are the current supplies I used to make this folded screen card.
Built for Free Using: My Stampin Blog

Sunday, March 29, 2015

Happy Easter Bunny

It's time for that cute little bunny to come hoppin' down your trail.  You can send this happy dancing bunny to your friend to wish them all a Happy Easter!   It is easy to make.
Emboss the card front with the Polka Dot embossing folder to give a nice background on the pistachio card stock.  Add a small band under the eggs to highlight your artful coloring job.  Add a splash of Dazzling Diamonds to his tail, some baker's twine, a couple of petite petals and you are good to go.  Happy Easter! 
Built for Free Using: My Stampin Blog

Serenity on Moon Lake

Nature Evokes the Imagination


I wanted to float along with this water bird as I made this card for my workshop. The piece of Adventure Bound Designer Series Paper makes this a card you could use for Father's Day.  In the background of the photo is a 12 x 12 sheet of the beautiful Painted Blooms Designer Series Paper on page 19 of the 2015 Occasions catalog.   Click here to see all of the patterns in the series.
Do you like the pansies and daisy in the picture?  It was so much fun to make the bouquet that I wanted to share a part of it with you.  The bouquet is on the Occasions catalog cover with details about the Build a Bouquet kit on page 29, or see them here
If you want to make this card, the supplies are listed below.


Thursday, March 19, 2015

Love is Kindness

The Love is Kindness stamp can be used for many occasions.  My February stamp class made this as an all occasion card for birthdays, thank you, or Valentine's Day.  Love is Kindness is a single stamp in the 2015 Occasions catalog. 

The "Typeset Specialty Designer Series Paper" coordinates with the newspaper wrapped around the tulip on the stamp!  To see the full set of Typeset paper click here.


Cut a sheet of Very Vanilla card stock in half lengthwise to measure 5 1/2" x  8 1/2" for the base of your tent card.  Cut a piece of Basic Black card stock to 5 3/8" x 4 1/8".  Cut Typeset paper to 5 1/4" x 4".  I love the Typeset paper and wanted to keep the boarders around it small.  Adhere a 5" piece of Crushed Curry ribbon from the 2015 Sale-A-Bration Best Year Ever Accessory Pack by taping the ends to the back of the Basic Black and Typeset piece about 1/3 up from the bottom.  Tie a small piece of the same ribbon around the long strip to form a knotted bow.  See all of the accessory Pack click on the 2015 Sale-A-Bration catalog on this blog. But, hurry, Sale-A-Bration ends March 31, 2015!

Stamp the image onto a 3 1/4" x 2 1/2" piece of Very Vanilla card stock.  Color the tulips and leaves with your favorite color Stampin' Write Markers.  I used Daffodil Delight and Old Olive.  Adhere to a
3 3/8" x 2 5/8" piece of Crushed Curry card stock.  Adhere to a 3 1/2" x 2 3/4" piece of Basic Black card stock.  Pop the set of flowers up with 4 Stampin' Dimensionals.  Viola!  a tulip card of kindness anyone would like to receive. 

You can stamp just the top portion of the tulips to the lower right of the inside of the card and also to the envelope. Here are the Stampin' Up! supplies needed for the Love is Kindness card.  Click here to order now.

Built for Free Using: My Stampin Blog