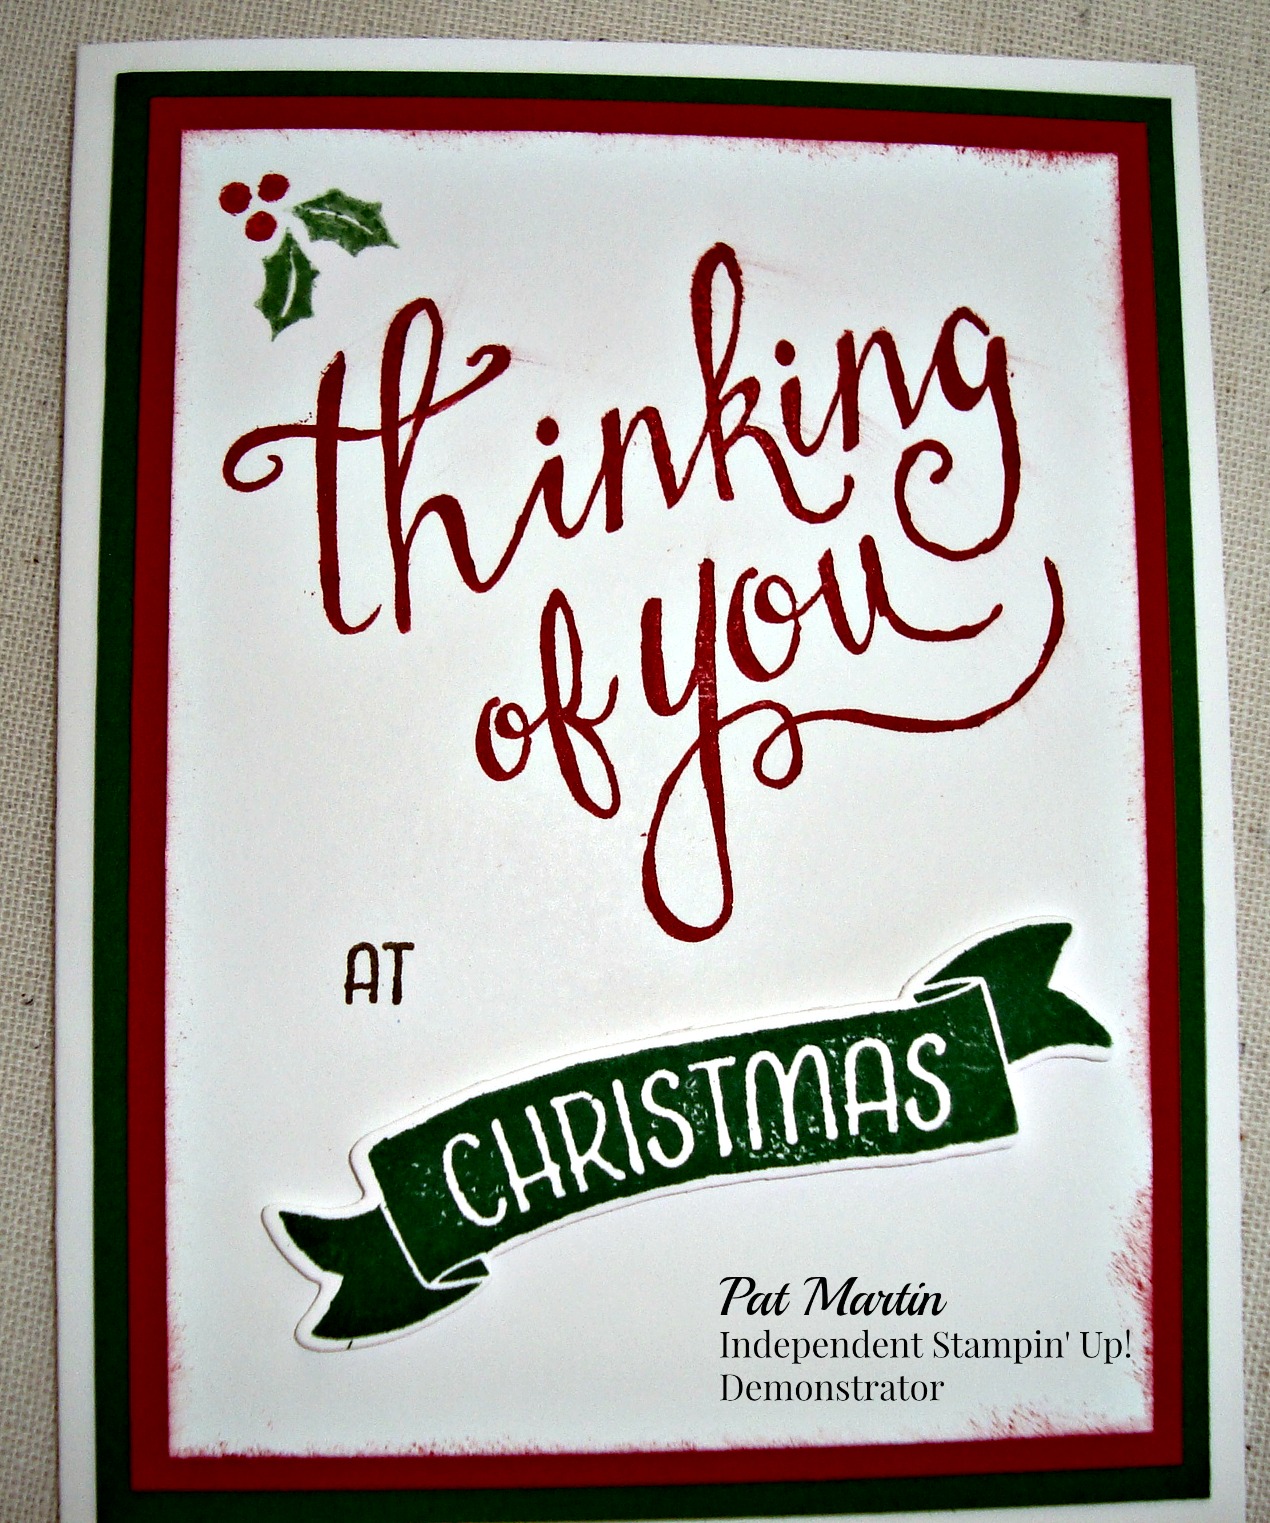
Make this easy Christmas card with the Stampin' Up! host set #141790 found on page 201.
I used Whisper White card stock, 5 1/2" x 8 1/2" scored at 4 1/4"as the base.
Other card stock needs:
162584 Garden Green, 4" x 5 1/4"
102482 Real Red, 3 3/4" x 5"
100730 Whisper White, 3 1/2" x 4 3/4"
Inks:
126975 Crumb Cake
126949 Real Red
126973 Garden Green
Directions: Stamp "Thinking of You" on smaller Whisper White card stock near the top, saving room for the holly leaf with Real Red ink.
Stamp "Christmas" with Garden Green ink on a scrap of Whisper White. Die cut the word with the coordinating #141488 Bunch of Banners Framelits. Attach with dimensionals.
Stamp "at" with Crumb Cake ink. Stamp the holly with Garden Green and Real Red ink. Adhere your stamped Whisper White to the Real Red card stock, adhere both to the Garden Green card stock. Adhere all to the Whisper White card base.
To purchase any of the products mentioned above, click here. The host stamp set is available as a reward for purchasing $150 or more in merchandise.
The host set is versatile in that it has banners that say "BIRTHDAY"," ALWAYS", "TIME OF YEAR" as well as "CHRISTMAS"; cute embellishments like the holly leaves and transitioning words like "at" such as "this", "on your". Now might be the time to reward yourself with a $150 order and choose Time of Year stamp set as part of your reward.
Thank you for stopping by. See another card made using Time of Year set on another post on this site.
Showing posts with label Christmas. Show all posts
Thursday, July 21, 2016
A Giant Amid the Bare Trees
The first Stampin' Up! stamp set I bought was Lovely As A Tree. I made our Christmas cards that year -- and, every year thereafter. I can still find times when I want to use Lovely As A Tree stamp set. This year I stamped the row of barren trees with Crumb Cake ink. Then I ran the Whisper White card stock through the Big Shot with the Softly Falling Embossing Folder.
I stamped the Peaceful Pines large scripted tree with Old Olive ink before I die cut it out with the Peaceful Pines framelit die using my Big Shot. I adhered it using dimentionals.
The ribbon is Real Red. The "Merry Christmas" sentiment from the Come to Bethlehem (retired) stamp set is stamped using Real Red ink on a scrap of Whisper White card stock and attached using dimensionals.
Adhere all layers together.
If you would like to purchase any of the supplies used to make this card, I would appreciate your business very much! Click here to shop in my on-line store. Thank you!
Stampin' Up! Supplies used:
Stamp Sets:
127793 Lovely As A Tree
139728 Peaceful Pines
Card Stocks:
100730 Whisper White, 4 1/2" x 8 1/2" card base, 3 1/2" x 4 3/4", 2 1/2" x 3" for tree, scrap for sentiment.
100702 Old Olive, 3 3/4" x 5"
102482 Real Red, 4" x 5 1/4"
Inks:
126953 Old Olive
126949 Real Red
126975 Crumb Cake
Misc.
139672 Softly Falling Embossing Folder
139665 Perfect Pines Framelit Dies
141693 3/8" Stitched Satin Ribbon, Real Red (substitute for retired ribbon I used)
143263 Big Shot Die-Cutting Machine
130658 Magnetic Platform
118484 Clear Block E
118483 Clear Block F
118489 Clear Block G
Thanks for stopping by!
I stamped the Peaceful Pines large scripted tree with Old Olive ink before I die cut it out with the Peaceful Pines framelit die using my Big Shot. I adhered it using dimentionals.
The ribbon is Real Red. The "Merry Christmas" sentiment from the Come to Bethlehem (retired) stamp set is stamped using Real Red ink on a scrap of Whisper White card stock and attached using dimensionals.
Adhere all layers together.
If you would like to purchase any of the supplies used to make this card, I would appreciate your business very much! Click here to shop in my on-line store. Thank you!
Stampin' Up! Supplies used:
Stamp Sets:
127793 Lovely As A Tree
139728 Peaceful Pines
Card Stocks:
100730 Whisper White, 4 1/2" x 8 1/2" card base, 3 1/2" x 4 3/4", 2 1/2" x 3" for tree, scrap for sentiment.
100702 Old Olive, 3 3/4" x 5"
102482 Real Red, 4" x 5 1/4"
Inks:
126953 Old Olive
126949 Real Red
126975 Crumb Cake
Misc.
139672 Softly Falling Embossing Folder
139665 Perfect Pines Framelit Dies
141693 3/8" Stitched Satin Ribbon, Real Red (substitute for retired ribbon I used)
143263 Big Shot Die-Cutting Machine
130658 Magnetic Platform
118484 Clear Block E
118483 Clear Block F
118489 Clear Block G
Thanks for stopping by!
JOY - It is Christmas in July!

To make this card, here is what you need:
141565 Joyful Nativity photopolymer stamp set
Card stocks:
101650 Very Vanilla, 8 1/2" x 5 1/2" card base. 3 1/2" x 4 3/4"
102584 Garden Green, 3 3/4" x 5"
119685 Cherry Cobbler, 4" x 5 1/4"
141628 This Christmas Designer Series Paper 1" x 4 3/4"
Inks:
126966 Cherry Cobbler
102283 Versamark
Misc.
103083 Embossing Buddy
109129 Gold Embossing Powder
129053 Heat Tool
Stamp "JOY" landscape in the upper third of the smaller Very Vanilla card stock with Cherry Cobbler ink. Let dry briefly, then use your embossing buddy on the inside of the "O". With Versamark, stamp the angel. Sprinkle with gold embossing powder, shake off the excess, and heat until melted. Adhere DSP along the bottom of the card. Adhere stamped Very Vanilla to Garden Green, then both to Cherry Cobbler panel and then all to the Very Vanilla card base.
To purchase any of the products used on this card, click here. Thank you for shopping with me!
For more cards using the 2016 Joyful Nativity Stamp Set, see this site.
Wednesday, October 21, 2015
Flurry of Wishes in Pacific Point and Night of Navy
I live in a part of California that does not see snow. So I had fun making this card full of snowflakes! If I had to shovel them, they might not conjure up such fond memories.
This card is a snap to make if you have the right Stampin' Up! tools.
The Flurry of Wishes photopolymer stamp set and punch for the two smaller snowflakes is on page 25 of the Holiday catalog or here They are available as a bundle for a 15% savings. The larger snowflake is punched out using the Flower Medallion Punch on page 167 of the 2015 Annual catalog. Or, see on-line, here.
If you prefer an evening feel, here is the same card made with Night of Navy card stock.
The dimensions and supplies needed are:
5 1/2" x 8 1/2", scored at 4 1/4" Whisper White card stock base
5 1/4" x 4" Pacific Point of Night of Navy CS
5 1/4" x 2 1/2" Whisper White CS
Scrapes of Whisper White CS for snowflakes,
about 1 1/4" x 3" for the smaller and 2 1/2" square for the larger snowflake.
Flurry of Wishes Stamp Set
Flower Medallion Punch
Snow Flurry Punch
Dazzling Details
Rhinestone Basic Jewels
Pacific Point Classic Ink Pad
Tempting Turquoise Classic Ink Pad
Marina Mist Classic Ink Pad
Randomly stamp the snowflakes onto the Pacific Point or Night of Navy card stock with the same color ink. Stamp the sentiment onto the2 1/2" x 5 1/4" piece of Whisper White card stock and tear the top edge to form a hill of snow. Adhere to bottom of stamped blue card stock. Stamp with all blue inks and punch out several snowflakes to randomly attach to card. Use stampin' dimensionals to lift some of the snowflakes, especially where one overlaps another. Add rhinestones to some of the snowflakes or a dot of Dazzling Details. Any embellishment you like may be added to the center of the snowflakes. Add a line of Dazzling Details to the edge of the "snow bank".
You probably will have enough "snow bank" left over to make another card.
The Flurry of Wishes stamp set and the Snow Flurry Punch are available at 15% off as a bundle. I have listed both the bundle and the individual pieces below.
Here are the Stampin' Up! supplies I used to make these cards. Click on any item to be connected to my on line store. Thank you.
This card is a snap to make if you have the right Stampin' Up! tools.
The Flurry of Wishes photopolymer stamp set and punch for the two smaller snowflakes is on page 25 of the Holiday catalog or here They are available as a bundle for a 15% savings. The larger snowflake is punched out using the Flower Medallion Punch on page 167 of the 2015 Annual catalog. Or, see on-line, here.
If you prefer an evening feel, here is the same card made with Night of Navy card stock.The dimensions and supplies needed are:
5 1/2" x 8 1/2", scored at 4 1/4" Whisper White card stock base
5 1/4" x 4" Pacific Point of Night of Navy CS
5 1/4" x 2 1/2" Whisper White CS
Scrapes of Whisper White CS for snowflakes,
about 1 1/4" x 3" for the smaller and 2 1/2" square for the larger snowflake.
Flurry of Wishes Stamp Set
Flower Medallion Punch
Snow Flurry Punch
Dazzling Details
Rhinestone Basic Jewels
Pacific Point Classic Ink Pad
Tempting Turquoise Classic Ink Pad
Marina Mist Classic Ink Pad
Randomly stamp the snowflakes onto the Pacific Point or Night of Navy card stock with the same color ink. Stamp the sentiment onto the2 1/2" x 5 1/4" piece of Whisper White card stock and tear the top edge to form a hill of snow. Adhere to bottom of stamped blue card stock. Stamp with all blue inks and punch out several snowflakes to randomly attach to card. Use stampin' dimensionals to lift some of the snowflakes, especially where one overlaps another. Add rhinestones to some of the snowflakes or a dot of Dazzling Details. Any embellishment you like may be added to the center of the snowflakes. Add a line of Dazzling Details to the edge of the "snow bank".
You probably will have enough "snow bank" left over to make another card.
The Flurry of Wishes stamp set and the Snow Flurry Punch are available at 15% off as a bundle. I have listed both the bundle and the individual pieces below.
Here are the Stampin' Up! supplies I used to make these cards. Click on any item to be connected to my on line store. Thank you.
Sunday, August 30, 2015
Oh, What Fun.................
Oh, what fun indeed! I have posted a couple of window cards from the inside looking outside. Here is a brick home with a brown window where you can peek inside to see the Christmas tree.
The card base is 5 1/2" x 8 1/2", scored at 4 1/4" Crumb Cake. The "wall" is made using the Brick Wall embossing folder found on page 174 of the Annual Catalog or at my on-line store here . To get the "mortar" lines on the wall, I brushed the raised side of the Brick Wall embossing folder with the Early Espresso Classic Stampin' Ink Pad before running the front of the card through the Big Shot. Despite several tries, I could not avoid a few smears of ink on the flat surfaces. Therefore, I sponged the wall with Crumb Cake, Early Espresso and Hello Honey ink to "weather" all the bricks.
The tree from the retired Evergreen stamp set and the star are stamped with Mossy Meadow and Hello Honey onto 3 1/4" x 2 1/4" piece of Very Vanilla. The window box and sentiment are also stamped on Very Vanilla card stock. I sponged the edges of the torn sentiment with Cherry Cobbler ink.
The window is cut from 3" x 3 1/2" Early Espresso card stock. Both the Window and the window box are dies from the Hearth & Home Thinlits Dies in the 2015 Holiday Catalog which goes live on September 1, 2015. The sentiment is one of the 17 photopolymer stamps in the Oh, What Fun stamp set on page 5 of the Holiday Catalog.
The stamped tree scene is adhered to the brick with a snail. The window is attached to the scene with Stampin' Dimensionals. I used dimensionals cut in half on the sides of the window frame and whole ones on the corners.
The window box is filled with Old Olive inked holly and cherry cobbler inked berries from the "Cardinal in Holly" Tapestry Stamp Set. The cardinal is from the same set. The bird is stamped with Crumb Cake ink and colored in with my Cherry Cobbler Stampin' Write Marker.
The bird is fussy cut and adhered with glue dot attached behind the window box at his feet. The window box is adhered with Stampin' Dimensionals.
I look forward to making this card again once I receive the Peaceful Pines stamp set and Perfect Pines Framelit Dies Bundle on page 17 of the Holiday Catalog. Come back later to see what I create!
Thank you stopping by and I will greatly appreciate your order.
All other products are available now. Click on any product below to link to my on line store. Here are all the products used to make this Oh, what fun! card. Remember the products from the Holiday Catalog are available for purchase on September 1, 2015. These are the first two on the list below.
The card base is 5 1/2" x 8 1/2", scored at 4 1/4" Crumb Cake. The "wall" is made using the Brick Wall embossing folder found on page 174 of the Annual Catalog or at my on-line store here . To get the "mortar" lines on the wall, I brushed the raised side of the Brick Wall embossing folder with the Early Espresso Classic Stampin' Ink Pad before running the front of the card through the Big Shot. Despite several tries, I could not avoid a few smears of ink on the flat surfaces. Therefore, I sponged the wall with Crumb Cake, Early Espresso and Hello Honey ink to "weather" all the bricks.
The tree from the retired Evergreen stamp set and the star are stamped with Mossy Meadow and Hello Honey onto 3 1/4" x 2 1/4" piece of Very Vanilla. The window box and sentiment are also stamped on Very Vanilla card stock. I sponged the edges of the torn sentiment with Cherry Cobbler ink.
The window is cut from 3" x 3 1/2" Early Espresso card stock. Both the Window and the window box are dies from the Hearth & Home Thinlits Dies in the 2015 Holiday Catalog which goes live on September 1, 2015. The sentiment is one of the 17 photopolymer stamps in the Oh, What Fun stamp set on page 5 of the Holiday Catalog.
The stamped tree scene is adhered to the brick with a snail. The window is attached to the scene with Stampin' Dimensionals. I used dimensionals cut in half on the sides of the window frame and whole ones on the corners.
The window box is filled with Old Olive inked holly and cherry cobbler inked berries from the "Cardinal in Holly" Tapestry Stamp Set. The cardinal is from the same set. The bird is stamped with Crumb Cake ink and colored in with my Cherry Cobbler Stampin' Write Marker.
The bird is fussy cut and adhered with glue dot attached behind the window box at his feet. The window box is adhered with Stampin' Dimensionals.
I look forward to making this card again once I receive the Peaceful Pines stamp set and Perfect Pines Framelit Dies Bundle on page 17 of the Holiday Catalog. Come back later to see what I create!
Thank you stopping by and I will greatly appreciate your order.
All other products are available now. Click on any product below to link to my on line store. Here are all the products used to make this Oh, what fun! card. Remember the products from the Holiday Catalog are available for purchase on September 1, 2015. These are the first two on the list below.
Built for Free Using: My Stampin Blog
Subscribe to:
Posts (Atom)


