Wednesday, November 2, 2016


 A Christmas Pop-up Card using Stampin'Up!
 Santa's Sleigh Stamp Set and Thinlit dies.  

The card front makes a nice card on it's own with your own message on the inside.


The inside is  CASED from Frau Susan Stempel.

Thanks to my math-minded husband for the A-6 card measurements figured in inches!


Give yourself plenty of time to make this fun card.

Lengthy directions below.


Santa’s Sleigh Pop-Up Christmas Card                                                    Pat Martin, October 2016 (CASED from Susan Stemplfs)

Stamp Sets and Dies:  H = Holiday Catalog, A = Annual Catalog
142057 Santa’s Sleigh, p. H24
140278 Santa’s Sleigh Thinlits 
*** OR Bundle 143499 – a 10% savings! P. H24
142114 Hang Your Stocking, p. H15 (Has matching thinlits and comes in a bundle for a 10%    savings.)
141706 Layering Ovals Framelits,  p. 193
137163 Sheltering Tree,  p. 96

Card Stocks:                                                                                   Dimensions:
141415 Emerald Envy,  p. 169                                               8 ½ x 5 ½,    
                                                                                                scrapes for trees, wreath +oval
120953 Crumb Cake,  p. 170                                                 2 ½ x 2 1/2
121044 Basic Gray,  p. 170                                          4 x 2 1/2
119685 Cherry Cobbler (CC), p. 170                               4 x 5 ¼ and 3 x 1 3/4
100730 Whisper White (WW),   p. 170          5 3/8 x 8 3/8 and a scrap for oval sentiment

Inks:
141396 Emerald Envy.  p.169
126978 Soft Suede,  p.170
126966, Cherry Cobbler,  p.170
126944 Daffodil Delight, p. 171
126982 Pool Party,  p.171 (May use Soft Sky)

Misc.
138401 Metallic Thread, p.178
135817 Lucky Stars Embossing Folder ( or Poinsettia EF, retired)
141337 Sponges,  p. 180
139684 Precision Base Plate, p. 190
140603 Die Brush, p. 190

Various markers to color your packages and stocking, if desired.

Card Front:

1.  Emboss 4 x 5 ¼ Cherry Cobbler (CC) CS with Lucky Stars Embossing Folder (EF).  (Or other holiday EF.)
2.  Center and adhere to Emerald Envy (EE) card base.
3.  Stamp 4 trees on Emerald Envy CS with Emerald Envy ink.  Die cut the 4 trees.  Put 2 aside for inside of card.
4.  Adhere one tree to left edge of embossed CC CS.  Trim about ½ inch off of other tree trunk.  Adhere with dimensionals with shorter tree overlapping left tree a little (see sample).  Leave room for sentiment ovals.
5. Stamp Merry Christmas onto WW scrap.  Die cut with oval framelit.  Adhere to die cut Scalloped EE oval.
6.  Place 2 ovals upside down on work space.  Apply SNAIL to back of EE oval.  Wrap Gold Metallic Thread around 4 fingers 4 – 5 times.  Twist thread in middle to make a figure “8”.  Adhere thread to SNAIL on back of ovals.  Arrange to your liking.
7.  Adhere sentiment to CC embossed CS next to trees.

Inside of Card:

1. Fold WW CS in half and lightly burnish the scoring fold.
2. Using Stampin’ Trimmer, insert folded edge to top of trimmer.  You will make slices into the double folded CS.  Begin at the LEFT edge. 

1.  Make the first slice 7/8 inches in from left.  Cut slice 1 ½ inch down or deep.
2.  Move CS to the left.  Align at 1 5/8 “.  Cut slice 1 ½ inch deep or down.
3.  Move CS to the left.  Align at 3 1/8 “.  Cut slice ½ inch deep or down.
4.  Move CS to the left.  Align at 3 3/8 “.  Cut slice 1/2 inch deep or down.
5.  Move CS to the left.  Align at 3 ¾ “.  Cut slice 1 ½ inch deep or down.
6.  Move CS to the left.  Align at 4 ¼ “.  Cut slice 1 ½ inch deep or down.                                             
3.  Open WW CS.  On the top inside section, stamp only down to the top of the slits.  Stamp “snow” with Pool Party or Soft Sky and stamp the “stars” with Daffodil Delight of Crushed Curry.

4.  With WW CS open:  From the back side, push all of the slits forward reversing the middle fold.  GENTLY pull slits from the front and close the card to make the “step platforms” neat.  Set aside.

5. Sleigh Bunting:  Using the Precision Base Plate, Big Shot die cut the “bunting” from the Cherry Cobbler CS.  Use the Die Brush to remove cut pieces.  SAVE CC CS SCRAP FOR NEXT STEP.

Move to Standard Cutting Pads for all other die cuts, not Precision Base Plate.

6.  Wreath bow:  Stamp the small bow with Cherry Cobbler ink in the center of the leftover CC CS “bunting”.  Using Standard platform, die cut bow.  Set aside. 

7.  Reindeer:  Stamp the reindeer with Soft Suede onto the Crumb Cake CS.  Die cut.  Set aside.

8. Santa’s Sleigh:   Big Shot die cut the sleigh from the Basic Gray CS. 

9.  EE Wreath:  Place the center die on the EE wreath first, then align the outer wreath die.  Big Shot die cut with Standard base plate.

10.  Sleigh goodies:   Stamp, color and fussy cut your packages.  Stamp and die cut the stocking; color with markers.  Set aside.

Assembly:
1.       Carefully and using a SMALL amount of glue, adhere CC bunting to gray sleigh.  Carefully adhere your teddy bear, packages, tree top and stocking to the back of the sleigh.  See sample for placement.  Set aside.
2.      Use glue dot to attach CC bow to EE wreath.  Carefully slide wreath over deer’s antlers and head.  With a small amount of glue, adhere wreath to the back of reindeer’s neck to hold wreath in place.  Set aside.
3.      Using liquid glue ( Take care with your glue so that you will be able to open your card ), place glue near, about ¼ inch up from center score of top of WW CS.  Add liquid glue around WW CS about 1/8 inch above platform slits.  DO NOT PUT GLUE ONTO SLITS!!   Continue to add glue to WW CS back of TOP ONLY!!  Carefully place on the inside of EE card base.  Do not push on the WW CS until you see that you have it centered both top and bottom and that the scores fit together and that you have equal margins of EE around WW CS.  When satisfied with the alignment, press top to adhere.  Gently lift the bottom of the WW CS and again glue around the slits and not too close to the score line.  Adhere bottom WW CS to EE CS.  Let dry.  Take a breath!
4.      Add glue to center only of one tree.  Carefully place the bottom left tree branch under the left platform.  (See sample.)
5.      Trim about ½ inch off bottom of the other tree.  Take a little off at a time until you can fit the two bottom right branches under the slit platform.  SPARINGLY, add liquid glue to bottom of slit to hold tree.  When tree is slid under the platform on the right, it will hold it in place.  Let dry.
__________________________________________________________________________________________ Attaching the sleigh and reindeer need careful attention.  Too much glue or glue in the wrong area will not allow the card to open.  Please take your time and double check your work before adding glue.

6.      Check alignment of reindeer onto platform.  Take care to see that deer does not extend past the edge of the card base.  Do not let deer touch bottom of WW CS base or it will not close and the legs will get mangled.  Make a small pencil mark on the back of the deer’s hip to know where to put the liquid glue. Do not add glue to the tail or legs.   Hold in place a few seconds until glue sets.
7.      Align sleigh with runner inside of card base.  Do not let sleigh runners touch bottom of WW CS to prevent runners from breaking or creasing.   Again, make a small pencil mark where platform touches sleigh.   Add a small amount of glue to body of sleigh, not the runners, where it touches the platform.  Hold sleigh in place a few seconds until set. 

Smile and enjoy the fruits of your efforts.  

To purchase any of the needed supplies, please see my on-line store, here.  THANK YOU!!

A Basket of Wishes Thanksgiving


BASKET OF WISHES THANKSGIVING                                                      Pat Martin October 2016

Stamp Sets:
142200 Basket Wishes, photopolymer , p. H49 (clear blocks needed)
128655 Lovely As a Tree, wood, OR 127793 clear,  (clear block needed)  p. 130

Cardstock (CS):                                                               Dimensions:
101650 Very Vanilla, (VV), p. 170             8 ½ x 5 ½ and 2 ¼ x 1 (banner)
126945 Pumpkin Pie, . p 171                             5 ¼ x 4 and 2 5/8 x ½ (banner)
120953 Crumb Cake,  p. 170                             5 x 3 ¾ and 2 ½ x 2 ½ (basket)

Inks and/or Markers:  Numbers are for ink pads,  Pages 170 and 171
126978 Soft Suede                                         126965 Cajun Craze
138327 Delightful Dijon                                126953 Old Olive
126945 Pumpkin Pie                                       126946 Tangerine Tango
131201 Pear Pizzazz                                       126972 Always Artichoke
126959 Wild Wasabi

Misc.
139673 Woodlands Embossing Folder, 6 x 6,  p. 195
103954 Aquapainter,  p. 180
141337 Sponges,  p. 180
134565Pumpkin Pie Ribbon, retired

Directions:
1.Stamp Basket on small Crumb Cake CS with Crumb Cake ink.  Align veggies atop basket and stamp with Crumb Cake ink.
2.  When dry, using markers or Aquapainter and inks, paint veggies.  Use VERY LITTLE water.  With an almost dry brush, shade left side of basket where it is ink shaded.

3.  Stamp sentiment on small Very Vanilla CS with Cajun Craze ink.

4.  Stamp small leaves on Pumpkin Pie strip, if desired.

5.  Dry emboss larger Crumb Cake CS with Woodlands Embossing Folder.  The word “Sizzzex” should be at the top right.

6.  When painted basket of veggies is dry, fussy cut leaving a small border around edges. 

Assemble:  Audition all pieces to see where you wish to place the ribbon and CS strips.

7.  Attach ribbon behind embossed Crumb Cake near top. If using double sided tape, add adhesive to remainder of Crumb Cake CS and adhere to Pumpkin Pie CS now.  Adhere both to VV CS card base.*

*You may complete assembly of the card front before adhering to other card stocks if you are not using double sided tape.*

8.  Stamp sentiment onto small VV CS.  May use as a rectangle or cut into a flag banner.  Adhere to small Cajun Craze CS and cut flag banner if VV is flag.  Adhere to middle of ribbon on left side.

9. Adhere small Cajun Craze strip flush with Crumb Cake right edge near bottom ¼.  Adhere stamped Pumpkin Pie strip flush with right side of Crumb Cake overlapping Cajun Craze by about ¾.  Pumpkin strip is shorter than Cajun Craze.

To purchase any of the supplies needed for this card from my on-line store, click here.

Friday, July 22, 2016

Two Christmas Cards using Stampin' Up!'s Joyful Nativity Stamp Set


I will point out the differences in the two cards here and give you the similarities below.


Landscape with sand dunes sponged with Crumb Cake ink using torn paper as a mask.  The Night of Navy Sky is embossed with Sparkle Embossing Folder.  The City on a Hill is stamped with Crumb Cake ink. 


The portrait card uses a large Very Vanilla "frame" border with a 3" x 3 3/4" liner insert of the 2015 Trim the Tree Designer Series Paper (DSP). The Night of Navy card stock is 3 1/2" X 3 3/4", heat embossed with a gold star.  The sand dune is torn from a 2 5/8" x 2 3/4" piece of Crumb Cake card stock.  


Both cards use 5 1/2" x 8 1/2" Very Vanilla as a card base. #101650.

The stamp set is 141565 Joyful Nativity.
The Holy Family is stamped with Soft Suede.
The shelter is stamped with Tip Top Taupe (retired) You could use Crumb Cake ink.
The sentiment is stamped with Night of Navy.

103083 Embossing Buddy
102283 Versamark 
109129 Gold Embossing Powder
129053 Heat Tool

To purchase any of the products in my on-line store, please click here.  Then click on the category to the left side of the opening page for the products you are interested in.  Or, simply input the product code number given above.  Thank you for your order.

Stop by again for more cards designed and made by Stampin' With Pat!

Thursday, July 21, 2016

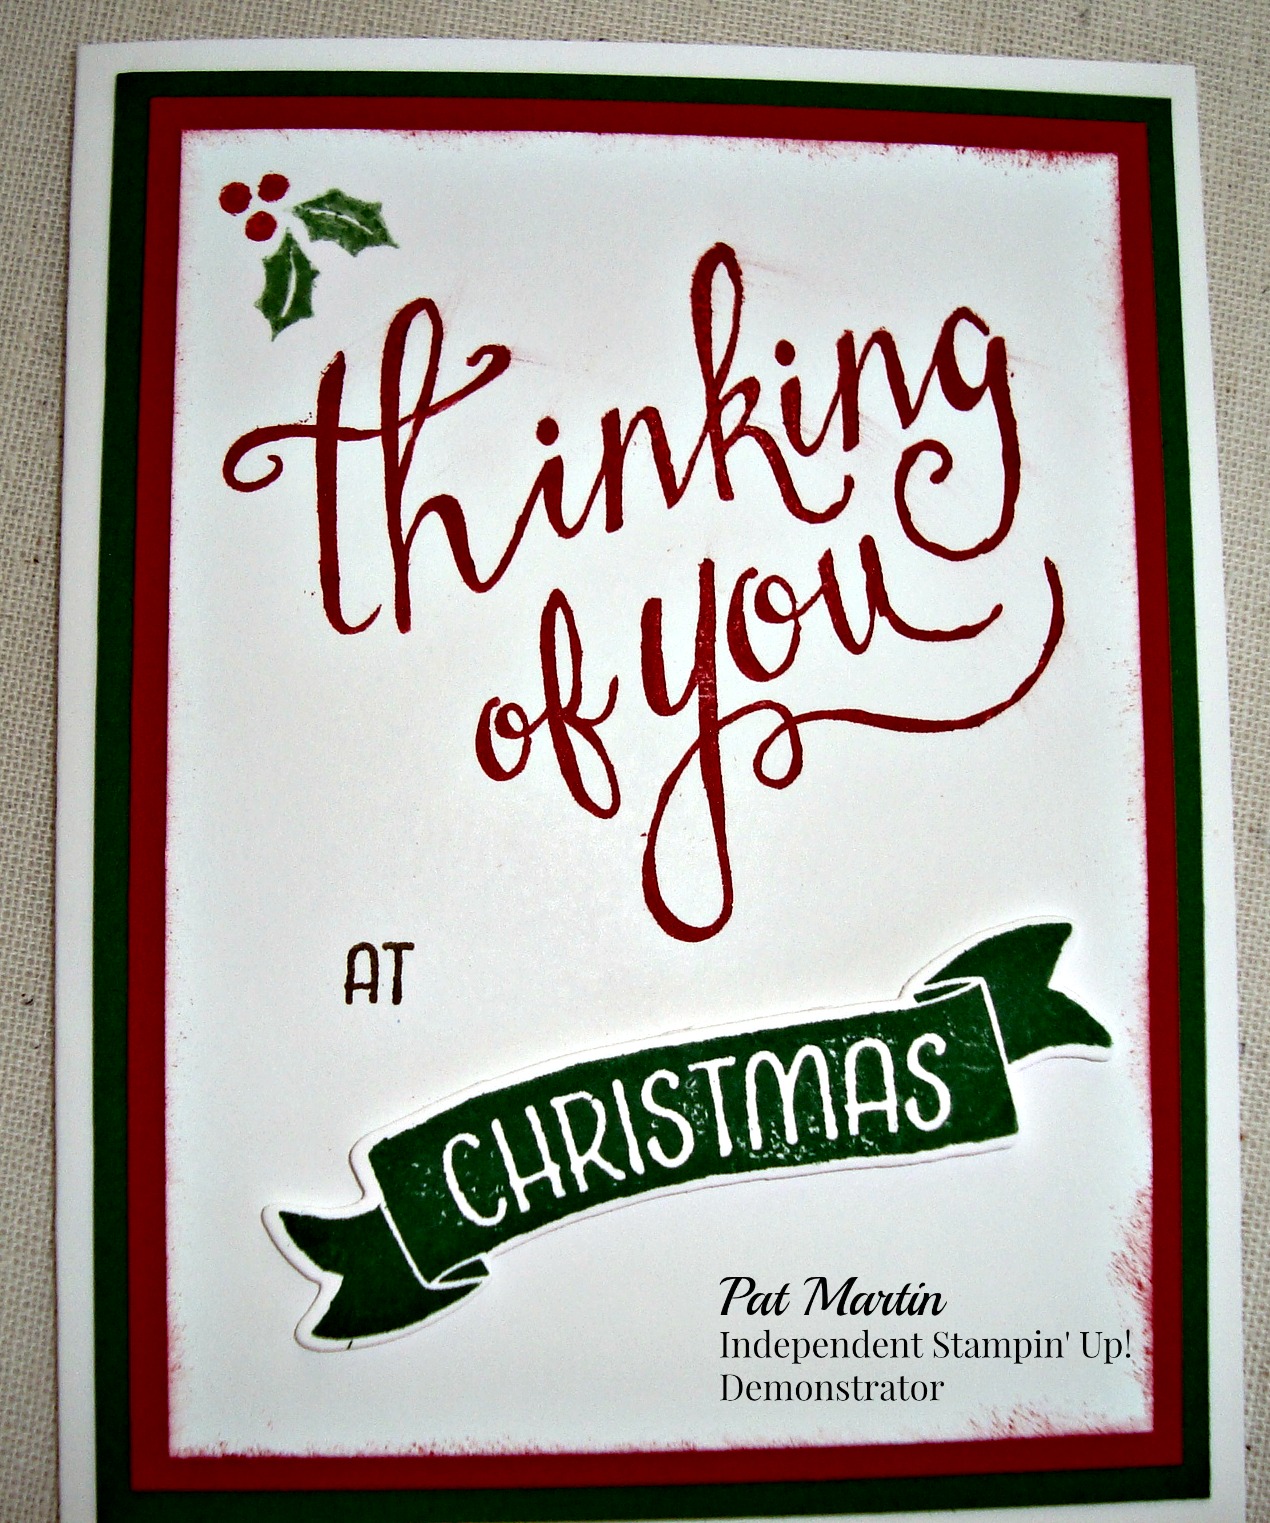
Easy Christmas Card

Make this easy Christmas card with the Stampin' Up! host set #141790 found on page 201.
I used Whisper White card stock, 5 1/2" x 8 1/2" scored at 4 1/4"as the base.
Other card stock needs:
162584 Garden Green, 4" x 5 1/4"
102482 Real Red, 3 3/4" x 5"
100730 Whisper White, 3 1/2" x 4 3/4"
Inks:
126975 Crumb Cake
126949 Real Red
126973 Garden Green
Directions:  Stamp "Thinking of You" on smaller Whisper White card stock near the top, saving room for the holly leaf with Real Red ink.

Stamp "Christmas" with Garden Green ink on a scrap of Whisper White.  Die cut the word with the coordinating #141488 Bunch of Banners Framelits.  Attach with dimensionals.

Stamp "at" with Crumb Cake ink.  Stamp the holly with Garden Green and Real Red ink.  Adhere your stamped Whisper White to the Real Red card stock, adhere both to the Garden Green card stock.  Adhere all to the Whisper White card base.

To purchase any of the products mentioned above, click here.  The host stamp set is available as a reward for purchasing $150 or more in merchandise.

The host set is versatile in that it has banners that say "BIRTHDAY"," ALWAYS", "TIME OF YEAR" as well as "CHRISTMAS"; cute embellishments like the holly leaves and transitioning words like "at" such as "this", "on your".  Now might be the time to reward yourself with a $150 order and choose Time of Year stamp set as part of your reward.

Thank you for stopping by.  See another card made using Time of Year set on another post on this site.

A Giant Amid the Bare Trees

The first Stampin' Up! stamp set I bought was Lovely As A Tree.  I made our Christmas cards that year -- and, every year thereafter.   I can still find times when I want to use Lovely As A Tree stamp set.  This year I stamped the row of barren trees with Crumb Cake ink.  Then I ran the Whisper White card stock through the Big Shot with the Softly Falling Embossing Folder. 

I stamped the Peaceful Pines large scripted tree with Old Olive ink before I die cut it out with the Peaceful Pines framelit die using my Big Shot.  I adhered it using dimentionals. 

The ribbon is Real Red.  The "Merry Christmas" sentiment from the Come to Bethlehem (retired) stamp set is stamped using Real Red ink on a scrap of Whisper White card stock and attached using dimensionals.
Adhere all layers together.

If you would like to purchase any of the supplies used to make this card, I would appreciate your business very much!  Click here to shop in my on-line store.  Thank you!

Stampin' Up! Supplies used:

Stamp Sets:
127793 Lovely As A Tree
139728 Peaceful Pines

Card Stocks:
100730 Whisper White, 4 1/2" x 8 1/2" card base, 3 1/2" x 4 3/4", 2 1/2" x 3" for tree, scrap for sentiment.
100702 Old Olive, 3 3/4" x 5"
102482 Real Red, 4" x 5 1/4"

Inks:
126953 Old Olive
126949 Real Red
126975 Crumb Cake

Misc.
139672 Softly Falling Embossing Folder
139665 Perfect Pines Framelit Dies
141693 3/8" Stitched Satin Ribbon, Real Red (substitute for retired ribbon I used)
143263 Big Shot Die-Cutting Machine
130658 Magnetic Platform
118484 Clear Block E
118483 Clear Block F
118489 Clear Block G

Thanks for stopping by!


JOY - It is Christmas in July!

I love this Joyful Nativity stamp set!  With the large "JOY" word, you have your card nearly made after you stamp it!

To make this card, here is what you need:

141565 Joyful Nativity photopolymer stamp set

Card stocks:
101650 Very Vanilla, 8 1/2" x 5 1/2" card base.  3 1/2" x 4 3/4"
102584 Garden Green, 3 3/4" x 5"
119685 Cherry Cobbler, 4" x 5 1/4"
141628 This Christmas Designer Series Paper 1" x 4 3/4"

Inks:
126966 Cherry Cobbler
102283 Versamark

Misc.
103083 Embossing Buddy
109129 Gold Embossing Powder
129053 Heat Tool

Stamp "JOY" landscape in the upper third of the smaller Very Vanilla card stock with Cherry Cobbler ink.  Let dry briefly, then use your embossing buddy on the inside of the "O".  With Versamark, stamp the angel.  Sprinkle with gold embossing powder, shake off the excess, and heat until melted.  Adhere DSP along the bottom of the card. Adhere stamped Very Vanilla to Garden Green, then both to Cherry Cobbler panel and then all to the Very Vanilla card base.

To purchase any of the products used on this card, click here.  Thank you for shopping with me!
For more cards using the 2016 Joyful Nativity Stamp Set, see this site.